etrailer | Air Lift LoadLifter 5000 Air Helper Springs Installation - 2007 Ford F-53

Click for more info and reviews of this Air Lift Vehicle Suspension:
https://www.etrailer.com/VehicleSusp...
https://www.etrailer.com
Don’t forget to subscribe!
/ etrailertv
Full transcript: https://www.etrailer.com/tvinstalla...
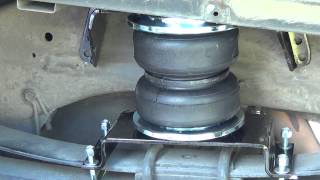
Speaker 1: Today on our 2007 motor home, with a Ford F53 chassis, we're gonna be installing Air Lift's LoadLifter 5000 air helper springs, part number, AL57140.This is what our airbags are gonna look like when they're installed. They get one for both the driver side and passenger side. So in a mount between the frame of your vehicle and your front suspension gear on your front axle. Here you can see our suspension with no air helper springs going over various terrains.And now you can see our suspension with our airbags installed and now you'll notice that it's much more stable. There's not as much oscillation between our suspension and our frame and overall, it's just a smoother ride. These air springs are gonna provide you with up to 5000 pounds of low inaudible 00:00:48 support.
This will reduce strain on your suspension and both improve safety and ride quality. This allows you to level out an uneven load. So if it's shifting to one side or to the front or the rear, you can adjust this with these air helper springs.One of the benefits of having a level ride is that it improves steering and braking performance because it keeps your suspension geometry in correct plain. It's also gonna decrease tire wear by making sure that the alignment is correct. This helps keep your tires level and going down the road straight, so they don't scrub or rub on the road.
You can also use it to help maintain proper headlight aiming because if you're loaded too far in the rear, the front's gonna lift up and your headlights are gonna point up towards the sky. If you're loaded too much in the front, it's gonna sag down the front, aiming them towards the ground. This way you can maintain that levelness and return those straight and have a nice, safe ride at night.The airbags themselves have Air Lift's exclusive upper and lower roll plates. These are constructed of steel and will help increase the load capacity of the air springs, protecting the springs from damage and extending the life of the air spring's suspension. The airbags are constructed of two ply, fabric reinforced rubber and the end caps, are made of a high strength nylon.
Which is lighter, stronger and more corrosion resistant than steel. You can adjust the air pressure between five and 100 PSI to get the perfect level ride. It comes with all the hardware you'll need to get it installed including the air lines and fittings. You'll receive two manual air valves, so you can adjust both the right and left side. And our customer here, has opted to install airbags for both the front and the rear for complete suspension low inaudible 00:02:26 control.We'll begin our installation under the front of the vehicle.
We're on our driver's side here. You wanna verify if you have JOHNS bumper. If you had one installed on yours, you're gonna need to remove it. We're gonna remove it using a half inch socket. And we'll do the same thing on the other side as well. We'll now prepare our airbags. We'll start by installing our air fitting into the airbag. That'll just thread into the hole here, you'll know you have the right side because there'll be three holes on this side, the other side only has two holes. You wanna put it on the hole that's towards the outside. We'll then tighten that down, using a seven sixteenths wrench. You wanna make sure that you've got at least a couple threads of sealant threaded down inside. That'll ensure you won't have any leaks.Now, we'll install our top mount. That'll just sit into place there. We'll use the shorter bolts that come with it. Put on a lock washer followed by a flat washer, we're gonna thread one into each of those holes. You just want them to be hand tight for now because we wanna be able to adjust it once we get it into position. And we'll do the same thing with our other airbag. Now, we'll install our bottom bracket and this is gonna be oriented depending on which side. So now that we've got each of our airbags like this, our driver side will have this facing towards the outside as this will butt up against the outside of the frame. And we'll want this bracket, with the square holes, facing towards the rear. If you're doing your passenger side, it'll be just like this, as we want this towards the outside of the frame.So we're gonna be installing our driver side now. So we'll have it oriented like this. So we'll flip it over and we're going to be using the slotted holes that are on the same side of our air fitting. We're gonna use the same hardware that we did on the top bracket. That include the bolt, lock washer and flat washer and thread it into those holes. Once we've got those